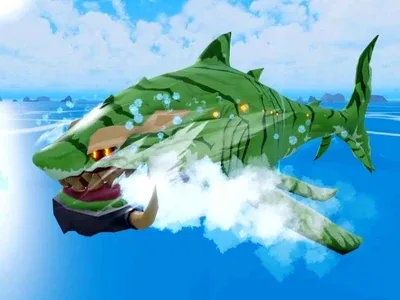
Terrorshark is a  Raid Boss Lv. 2000 with 150,000 HP that appears out at sea in the
 Third Sea, between
 Sea Danger Levels 2 and 6. Once there, it circles around your boat and attacks relentlessly until either the boat or you are destroyed. Its Anchored variant, with 195,000 HP, is the only way to obtain the
 Shark Anchor, and it's also one of the most hated
 Sea Events in the community because it ruins nearly every hunt in progress.
How to get it
It has a chance to appear whenever you're between Sea Danger Levels 2 and 6 in the Third Sea. You don't even need to be sailing - it can spawn in a radius around a stationary boat. You spot it by three signs that appear together: a large health bar at the top of the screen, the screen darkening, and the music changing.
How It Appears and Behaves
- Spawn Range: Sea Danger Level 2 to 6, in the Third Sea.
- The higher the Danger Level, the stronger and harder it becomes to kill. The Fandom advises against going above level 5, where Terrorsharks are already very powerful.
- Raising the Danger Level doesn't increase its HP - it simply brings more
 Sharks with it and hits harder.
- It's nearly impossible to shake off. Only fast fruits like
 Light or a boat like
 The Sentinel can sometimes outrun it.
- Multiple Terrorsharks can appear at the same time.
 Combat becomes significantly harder: they attack one after another without downtime, and the splash can stun lock you until death or the end of their combo.
- If you're sitting in a boat seat, its splash will eventually eject you.
Anchored Terrorshark and the Shark Anchor
Anchored Terrorshark is a special version that has a chance to appear if the player piloting the boat has a  Monster Magnet.
- When the Monster Magnet is consumed during an encounter, it displays: "Your <Monster Magnet> has attracted an irregular beast...".
- If the
 Magnet was properly used and the shark displays 195,000 HP, its holder has a 100% chance to obtain the Shark Anchor after defeating it.
- Only the player whose Monster Magnet was consumed can obtain the Shark Anchor.
- If multiple players have a Monster Magnet when a Terrorshark appears, only one leaves with the anchor, but the other players' Magnets are not consumed.
What It Drops
Guaranteed Drops: - 1 Level - 20,000 to 25,000 Beli - 300  Fragments - 1,000
 Valor -
 Mutant Tooth
Possible Drop: -  Terror Eyes
Other Drop: - Shark Anchor, only if it consumed a Monster Magnet, and only for the relevant player.
Its Attacks
| Attack | What It Does |
|---|---|
| Typhoon Splash | It leaps out of the water, pulls all nearby players toward it, then crashes back down in a water surge. The move breaks  Instinct, deals massive damage, and knocks you far back. It uses it at close range and you can't trick it with Instinct. The explosion resembles the [Z] Typhoon Toss of the Shark Anchor, but larger with more effective pulling. |
| Squalus Dance | When you get close enough, it chains tail strikes that send you back into the sea. It uses this especially if you're swimming or getting too close. Very dangerous facing a group of Terrorsharks, who can spam it and completely prevent you from keeping your distance. Resembles the [X] of the Shark Anchor, with much larger area of effect. |
| Super Charge | It charges at very high speed toward a player and triggers an explosion on impact. Unlike its other attacks, this one has no equivalent on the Shark Anchor weapon. |
How to Defeat It
The Basics: - Dash backward and spam M1s - you'll hit it while it struggles to reach you. - Going in a group spreads out the damage from its bites, lets you overwhelm it, and limits the effectiveness of its super splash. - Shark race V2, V3, or V4 is highly recommended - Terrorshark can send you underwater and drown you. V3 and V4 avoid cheap deaths, and the  Leviathan's Armor ability from
 Race Awakening saves you from enormous damage. Both stack very well. - Race Awakening in general is strongly advised, simply because you survive longer.
Strategies That Work: -  Angel V4: stay airborne well above it (hold jump) and spam
 Magma attacks from above. Devastating when multiple Terrorsharks appear. -
 Angel V3 with Heavenly Blood, plus Lei or
 Leviathan Crown equipped: healing becomes huge and keeps you alive. - Awakened Magma: go airborne with a mobility move then spam Z (holding), V, and C. None of its attacks hit you if you're high enough, making it soloable. Use a sword or fighting style that can propel you upward, like
 Godhuman's Z and C, to maintain altitude. -
 Buddha: M1s hit both the Terrorshark and surrounding Sharks at the same time, plus you get massive damage reduction and water immunity once awakened, preventing drowning. You can also take shelter behind your boat and hit it from range. Climb a rock in awakened form - it can then barely use anything but its pull attack. Always take the boat with the most HP possible, it helps with other Sea Events too. -
 Mammoth: one of the best fruits for shark hunting thanks to the transformation's F move that lets you escape, very useful for solo Shark Anchor hunting. Downside: its damage is weak. -
 Blizzard: good alternative for Sea Events thanks to its large area of effect and solid range, but hard to play solo since you need to stay close. - Awakened
 Phoenix: fly above it and let passive damage do the work. Bonus: you can emergency heal teammates. -
 Love: Z and X abilities used in flight work very well against it. -
 Soul Guitar: its two moves can stun it, buying you time. - Gas: its M1s can stun Terrorshark in a loop, making it one of the best fruits for hunting it. - Leviathan Crown: 35% extra damage on Sea Events, plus a healing bonus.
How to Avoid It While Hunting Something Else: - Hunting Leviathan without a  Portal player: if a Terrorshark appears, everyone not piloting jumps off to fight it while one player sails the boat away, which the shark can target. - With a Portal player: Portal's [V] move prevents Terrorshark from touching you - it eventually disappears and you resume your hunt peacefully. - With Kitsune: use the transformation's [V] and run in a straight line away from your boat until the Terrorsharks disappear, then return.
 Pilot Helmet increases your chances of escape, as do speed passives from
 Human,
 Rabbit, Shark, or
 Ghoul V2.
Did You Know?
- Players often abbreviate it as "TS," and its Anchored version is nicknamed "Anchorshark".
- It can appear in multiple colors: red, green, blue, and gray.
- It uses the
 Terror Jaw model, but much larger.
- It can disappear if you leave its zone. As long as it's chasing you and taking close-range damage, it stays. If you run far enough, it even has a chance to get stuck somewhere.
- You can camp in the air with ranged attacks and kill any number of Terrorsharks without taking any damage.
- Terrorshark can growl. In testing, you only hear it when its music stops after you leave its zone - it also trembles while growling.
- There's a small chance to craft a Monster Magnet while already owning a Shark Anchor. In that case, the mastery, enchantments, and moves of your current Shark Anchor don't completely disappear, but they're also not recoverable on a future Anchored Terrorshark.
- It's one of the most hated Sea Events in the game: it interrupts hunts at
 Kitsune Island,
 Prehistoric Island, or
 Frozen Dimension, and constantly ejects you from the boat.
Our take
 Guardian of the Shark Anchor. Come with a Monster Magnet, the Shark race, and preferably Awakened Buddha or Magma, and face it at a reasonable Danger Level - trying to flee almost never works.
 Bosses
 Red Commander
 Red Legionnaire
 Rip Commander
 Rip Legionnaire
 rip_indra
 rip_indra True Form
 rip_return
 Saber Expert
 Smoke Admiral
 Soul Reaper
 Stone
 Swan
 Terrorshark
 The Gorilla King
 The Saw
 Thunder God
 Tide Keeper
 Tyrant of the Skies
 Unbound Werewolf
 Vice Admiral
 Warden
 Wysper
 Yeti
 Zero